Back to Home
Cooling Fan to a Mobile Radio
By John Haserick W1GPO

|
Back to Projects Back to Home |
Adding a Temperature-Controlled Cooling Fan to a Mobile Radio By John Haserick W1GPO |
|
Background:
It seems to be "in with the small dash mount radios" and "out with the heavy duty trunk-mount mobile radios" these days. The problem in amateur service is how to achieve enough power with sufficient talk time without overheating the radio. Most commercial two-way radios have enough power, but only for a 20% talk time with a one-minute time-out. Also, many radios manufactured for amateur use seem to run quite hot on high power. For example, the Kenwood TK-6110 low band mobile rated 70 watts for commercial service either needs to be cut back to 45-50 watts for amateur service, or needs a heat sink fan added for 70w.
Almost all of the TK-6110's heat sink is located under the radio, so the fan needed to be mounted under the radio. Fortunately, three favorable factors made it worth attempting. Most important was a convenient source of 13.8 VDC power available via the rear accessory plug that was switched off when the radio was turned off. Second, the radio mounting bracket can be positioned with enough space to fit a thin fan, but still a second identical bracket can be mated to the lower bracket and placed above the radio for under dash mounting, using the lower bracket to shield the fan from fingers, etc. Third, it is desirable to run 70 watts if possible. Rather than design and build an intelligent fan controller, I found it easier to buy a stock temperature control module and a small fan and mount them under the radio.
The combination of a quiet, very thin fan with good airflow, and a very small controller made this a complete success. At an ambient temperature of 68 degrees, the fan will hold the heat sink to 100 degrees in amateur service, whereas without the fan the heat sink climbed to 140 degrees after 15 minutes at a 50% duty cycle, one minute on, one minute off.
Components:
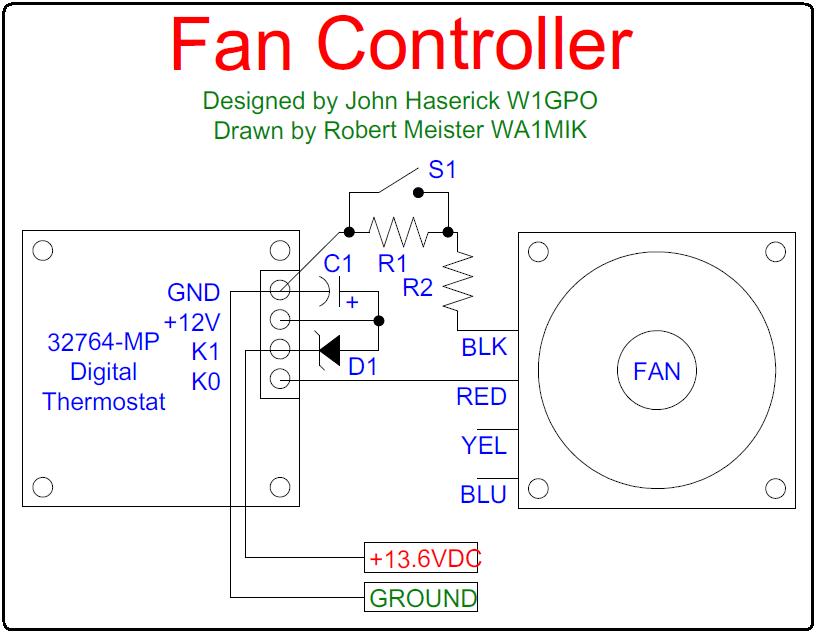
The heart of the system is a temperature control / thermostat module, part number 32764-MP and was purchased from Marlin P. Jones and Associates Inc. (www.mpja.com) for about $7. The board has several switches and a three-digit LED temperature display (this model shows degrees using the Fahrenheit scale). An external temperature sensor can be mounted wherever you want and dry relay contacts can operate whatever you want. The unit only needs a source of 12VDC (nominal) and is fully programmable. Click here for the data sheet or get it from MPJA's web site.
The fan is part number 2230985 and was purchased from Jameco (www.jameco.com) for about $10. It's an 80x80x15mm DC fan that can operate on 7-12VDC. It has a speed (tachometer) output and a PWM speed control input but these features were not used. Click here for the data sheet or get it from Jameco's web site.
Only a few extra components are required. These parts can be bought through mail-order parts suppliers such as Jameco, Mouser, or Digikey.
You will need some 3/8-inch (8mm) plastic spacers and mounting hardware for the fan (#10-32) and controller (#4-40). We leave that "as an exercise for the student." The schematic diagram is shown below. Click on it for a larger view.
Construction:
Construction is not critical. All wiring is point-to-point. The fan and controller were mounted to an extra mobile mounting bracket. See the photo below.
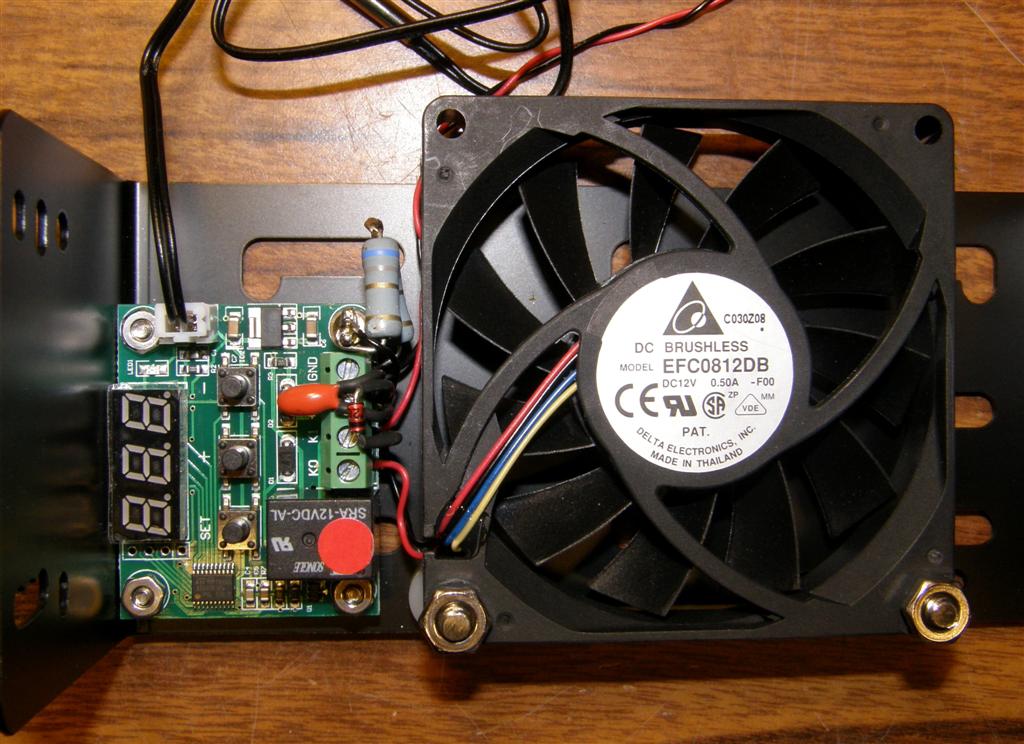
The fan is mounted with two screws, at the front of the bracket. The controller is mounted with three screws. See their locations in the photo below.

The controller was positioned so the temperature display could be seen from the front, under the radio. See the photo below.
You can see that the fan was mounted on 3/8-inch (8mm) plastic spacers to allow air to get into the fan. This provided plenty of clearance for proper airflow. The temperature sensor was secured to the rear of the radio's cast metal heat sink as seen in the photo below.

Settings and Performance:
I programmed the temperature controller so the "on" temperature was 90 degrees F, with the default hysteresis of 2 degrees, so the fan turns on at 92 degrees, off at 90 degrees. The radio runs at 80 degrees when receiving with a 68 degree room temperature, so the fan only comes on when the heat sink gets warm due to transmitting. The fan runs for about a minute after transmission stops, when the temp gets back down to 90 degrees. The controller is very flexible so you can alter the settings as you see fit.
I tested the operation by starting with the radio turned off in the basement where the temperature display showed 63.0 degrees. I keyed up the radio continuously for 10 minutes until the heat sink reached 100 degrees. The fan turned on after 4 minutes of key-up, when the heat sink reached 92 degrees, and kept running with about a 1 degree initial temperature drop, and then slowly rose to 100 degrees. The radio was putting out 68-70 watts the entire time. After I stopped transmitting, the fan ran for 3 more minutes until the temperature dropped to 90 degrees. The fan turned on after 30 seconds when the heat sink rebounded to 92 degrees, then turned off after another 30 seconds, then turned on again briefly after another minute.
As far as fan noise, there is more of an airflow noise than hum noise, but both are minimal.
I want to thank Bob WA1MIK for his advice, patience, and assistance in getting this article posted.
Contact Information:
The author can be contacted at: jhaserick84 [ at ] comcast [ dot ] net.
Article text and photos by John Haserick W1GPO.
Schematic drawn by Robert W. Meister WA1MIK.
HTML coding and some text by Robert W. Meister WA1MIK.
Back to the top of the page
Back to Projects Index page
Back to Home
This web page created 10-Mar-2017
This web site, the information presented in and on its pages and in these modifications and conversions is © Copyrighted 1995 and (date of last update) by Kevin Custer W3KKC and multiple originating authors. All Rights Reserved, including that of paper and web publication elsewhere.