This project started out to convert this particular radio for APRS use. There was some work involved to get this info put together. But not as much as I thought.
As with any conversion project you want to make sure the radio is working before you start any conversions. If all is well then start to proceed with the following. I would suggest that if you are not familiar with this radio obtain a diagram or manual. As always, what you do to the radio is your responsibility and not that of the article writer.
First, make sure you have a working radio. If so order your crystals for the frequency you want from your favorite supplier and proceed. If it is working, make the necessary repairs before starting this process.
Read through these instructions and become familiar with the conversion before attempting the work.
This conversion has to do with changing coils in the exciter section. The receiver worked fine in mine so this issue will not be addressed here. You will need to have a good soldering station and some solder wick. A de-soldering station is great if you have access to one.
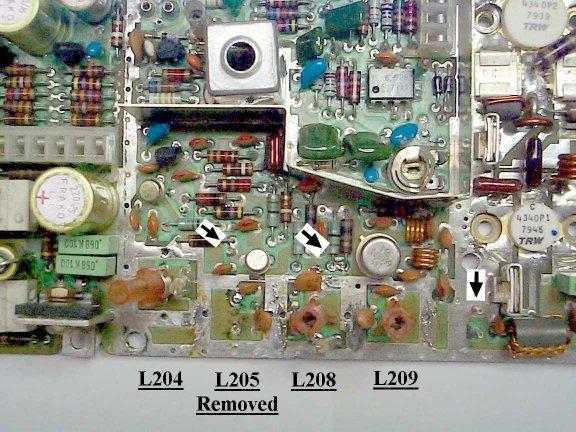
The coils involved are L204, L205, L208 & L209. All four of these coils are the same, 3 1/2 turns. The original part number is 19A134727P3. A new part number of 19J706083P12 superceded the old one. You will need to change at least two of these depending on your radio. Specifically L205 and L208. In our conversion we also changed L209 but found it was unnecessary. Please refer to the picture for the locations. Looking at the front of the board, these would be located at the right, just behind the power switch. (From front to back, 204-205-208-209.)
There are a couple of ways to accomplish the change. One is to order new coils from GE. The part number that I used is 19A134727P6 and was taken from the manual. Referring to an old service parts book, this number was superceded by 19J706083P5. These are oscillator coils (L153) and the tap should be removed leaving only the two connections. What you end up with is a coil with 4 1/2 turns. An addition of one turn to the normal coils you will remove.
If you are going to order coils, then wait until they come in to proceed.
Remove the top, bottom and front covers of the unit and then remove the PL board and the accessory board. This is necessary as the RX/TX board must have the power transistor screws and nuts removed. These are little so be careful not to loose them. I like to put a towel down under the unit so if it falls I can find it easy. If it falls to the floor, well, it's gone as they say and will take you a while to find.
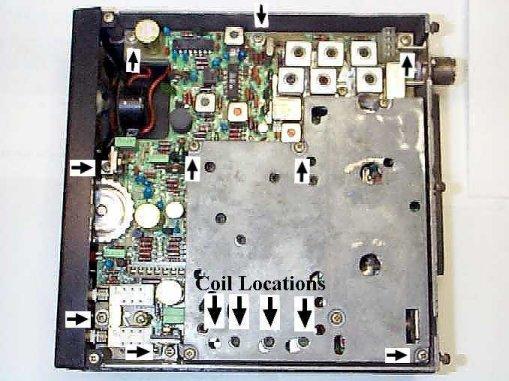
Flip the unit over and remove the inside shield. The coils are located inside just behind the power switch. Then remove the screws that hold the board in.
Once the board is removed and you have safely stored all the screws, you can remove the coil shields and the coils themselves. When removing the coils there is a small tab. With L204 and L205 these tabs point to the front. With L208 and L209 they point to the back or the PA section. Refer to the pictures again for the placement. If you have a Weller, use a hot tip for the shields. Again a de-soldering station is nice, but wick will do the job.
If you have ordered new coils, they can be installed and the unit put back together. Remember the tab position on the coils. Please be sure you have no solder bridges. This can cause great problems later as we are all aware of. If you have trouble cleaning the holes out for the coils and/or shields as I did, you can use a PC board drill if you have one to help. Don't use an oversize drill, as this will remove the feed through bridge to the board. I just used the drill in between my fingers
For the brave of heart, the old coils can be removed and a new one wound with approximately the same size wire with 4 1/2 turns. The same size wire is important to obtain the same "Q" for the circuit. If you wind your own, use a soldering iron to heat the wire to remove it. This will leave the winding treads intact. But beware, do this rather quickly. You do not want to melt the whole form, just the plastic holding the wire in place on the form. Pull the wire while heating with needle nose pliers. Clean the form with a razor knife if needed.
Once the new coil is wound, reinstall them remembering the tab positions. Reinstall the shields and put the board back in the radio.
When reinstalling the board it would be a good idea to put some fresh heat sink compound on the driver and final where it meets the heat sink. A little bit here will save you later from changing the final and/or driver. Another word of advice if you do have an old heat sink for a TO-5 this can be installed on the pre-driver. I usually do this rather than going to the hill again. Do this especially if this is going to be used for semi-constant duty cycle. A little effort here is cheaper than gasoline and time.
Once the TX/RX, PL, and ACC boards are mounted again, you can test the unit out and retune as necessary. You should see a rise in RF as you go along at the test points I used. I did this without the inner shield in place. This gave me access to the tuning points.
Once the unit is tuned, reinstall the inner shield and the covers and away you go.
Notes of some things I ran into.
I did not have to change the L204 coil. Only the L205 and L208. I did change L209 but found in my unit that it did not need to be done, as the tuning range was adequate. No caps were changed at all, only the coils. I would suggest just changing out L205 and L208 first and see if it will tune up. The receiver unit tuned down easy enough with a sensitivity of 0.20 u.v. Good enough for me for this unit. This unit was put on 144.390 for APRS use.
In tuning the unit, very little equipment was used. A generator is handy, in addition to an RF Probe and If you have one and RF Milli-volt meter.
The total time to change this and get the unit going should be less than 3 hours without interruptions. I did have to scrounge some coils for experimenting. Look in some of the older portable TV sets or radios for coils if you do not want to order or rewind. You may find what you are looking for. If you do, remember to change the slugs out also from the old coils for tuning purposes.
Good luck in your process and I expect to hear some new radios on the air.
If anyone has questions, please feel free to contact me at
gephart@iinc.com,
or snail mail below.
Fred Gephart
WA2CAM
10596 Main Street
PO Box 188
Alexander, NY 14005
Copyright © April 11 2000 WA2CAM
html Copyright © April 12 2000 Kevin K. Custer W3KKC
All Rights Reserved.