Battery Backup Information
Compiled and HTML'd by Mike Morris WA6ILQ
Maintained by Robert Meister WA1MIK

| Back to Index |
Astron Linear Power Supply Battery Backup Information Compiled and HTML'd by Mike Morris WA6ILQ Maintained by Robert Meister WA1MIK |
|
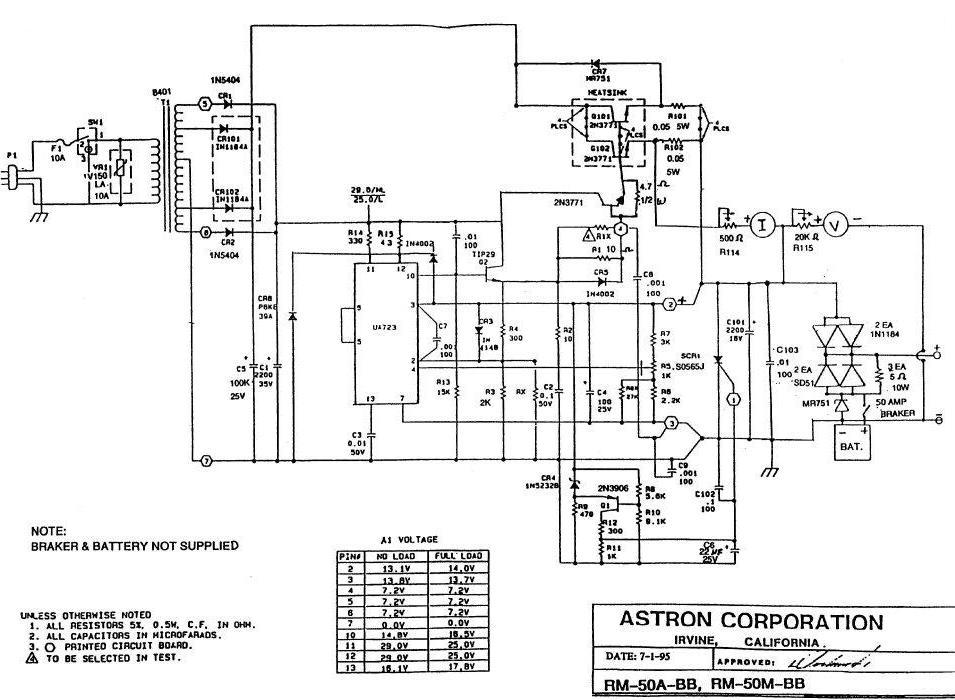
If you inspect the circuit diagram of any -BB astron supply you will see that the BB option is simple - it consists of a pair high current diodes wired cathode to cathode, with one anode going to the supply, and the other to the battery bank, and the cathodes feeding the load. This configuration allows either the power supply or the battery to feed the load. In the low current supplies they use half of a bridge rectifier, in the high current supplies they use two separate diodes in parallel for each current path.
The overly simple Astron charging circuit will kill your battery or boil it dry!. This is the voice of experience. They use just a single resistor from the battery to the output of the supply (look for R103 on the schematic for the RS-12-BB and RM-35A-BB, R28 on the schematic for the BB-30, or a similar resistor in other BB supplies)...
The rule of thumb on maximum charging current for nickel-cadmium or lead-acid batteries is no more than 1/10 of the amp-hour capacity of the battery. Therefore a 20 amp-hour battery has a maximum charging current of 2 amps. Lithium-based batteries are different, and the actual value depends upon the actual chemistry.
There are major flaws with the Astron charger design:
Now in real life, the battery voltage is not going to be zero, so the difference voltage is not going to be the full Astron output of 14 volts and the charging current is going to be less than 8 amps, but still... there are better charging circuits out there than a 14 Volt 50 Amp power supply and a single undersized current limiting resistor. Especially with the extra requirement that the Astron supply voltage has to be set to the battery resting voltage plus the series diode voltage drop (no matter what voltage the load - your repeater system - wants to see).
If you need a battery backup system for your repeater, I would note a few things:
First, disconnect the charging resistor (R103 or its equivalent in other supplies) and replace
it with a multi-stage external charger. Yes, that means a power supply and a battery charger
at your site. Samlex makes a very good one in their
SEC-1250UL. They also have a 30 amp version. I have several in service at the
commercial repeater sites that have battery banks. There are other good ones out there,
just look at the ones made for high-end RVs. If all you need is something to keep the
battery topped off I've used a 3, 4 or 5 amp "Battery Tender" made by Deltron Corp with excellent success.
Second you need to decide if you are going to install a Low Voltage Disconnect (LVD). This is a device that protects your expensive battery bank from battery-damaging overdischarge. On a "12 volt" lead-acid battery that is basically around 11 to 11.5 volts. You need to decide if your communications during a power outage is more important than your battery.
Third, do NOT use a common automotive starting battery as the backup for your repeater (except as a proof-of-concept workbench setup). The commercial sites where my repeaters are located tend to be concrete block buildings on a concrete slab floor on top of dirt. The slab floors make excellent heat sinks and in the winter are COLD... and cold temperatures reduce the storage capacity of a battery, especially one that is just set on the concrete floor of a site that may be at 10-30°F. You really want to put the batteries in a plastic battery box (in case the battery case splits and leaks, and yes they do), and sit that on a couple of inches of hard foam insulation to keep them thermally floating above the floor. Alternatively set them on a rack mount battery shelf, or on a couple of inches of hard foam insulation on top of the steel shelf. At the sites I visit there are rack mount shelves that are sized to hold four Group-27-sized AGM batteries.
Do some research. The RV world, especially the full-timers, depend on their battery banks. Motor homes have two independent battery systems, the "chassis" or "starting" battery that runs the engine and everything engine related, and the "house battery" or "coach battery" that runs everything else. The alternator charges the chassis battery, the house battery is charged by the "converter" (that's their industry term) is powered by the power "pedestal" in the RV park or the AC outlet at home. The "repeater-builder" web site of the RV world is a web site called iRV2.com and collectively the members have a wide area of knowledge of RV battery systems. Some of the more informative comment threads are very educational. If you go there, search for the the "house battery" or "coach battery" threads and read them.
Overall, the RV battery type with the most bang for the dollar is a flooded lead-acid "GC2" 6 volt, 200-230 amp-hour battery, and you can get them from multiple vendors, including Costco and even Sams Club. As they are 6 volts you will need two in series, and a set of two will give you a useful 100ah per pair due to the fact that maximum life from a flooded lead acid battery is reached by limiting them to a 50% depth of discharge (DOD), i.e. never discharging them to less than a 50% state of charge (SOC). The next cheapest battery type is a sealed lead-acid ("SLA") deep cycle AGM battery. Parallelling batteries to increase the run time is common. The largest diesel "Class A" RVs may have as many as 8 of the AGM batteries in parallel. Some of the newer RVs use a lithium based house battery, "Battleborn" is a commonly seen brand.
If you are going to "roll your own" high current BB conversion, and you don't mind a "non-pretty" implementation, then a part of the diode array from a high-current alternator will work just fine. The normal "12 volt" automotive alternator diode array has six diodes in it (or sometimes 12 in 6 groups of 2 in parallel or 18 in 6 groups of 3 in parallel), and the metal plates with the diodes mounted in them are usually tossed in the trash if one diode is dead. A long time ago I lost a bearing in the alternator in my old 1971 Dodge Dart ex-DEA undercover chase car... (that was a FUN car to drive...) The factory alternator was oversized for the car, and a exact replacement unit was not readily available. The motor pool manager at the local police department recommended a local auto-electric shop... they said they could rebuild my alternator. I used the visit to pay a few dollars for a used three-diode common-cathode array that had one bad diode that came out of a 200 Amp alternator.
When I got home I mounted the diode plate in a bench vise and used a drill and hacksaw to remove the bad diode. This gave me two good high-amperage diodes and enough space around the diodes to allow drilling a couple of mounting holes. Using that diode plate mounted on standoff insulators I ended up with the same circuit as the Astron BB option at a cost of a few dollars plus the standoffs... and in my proof-of-concept prototype the plate was held to two pieces of wood by some drywall screws. The final version used polystyrene rod for the insulators.
All of this was done over a decade before Astron came out with their BB option. Nowadays it may be easier to just buy the BB-30 from Astron, or a new Astron with built-in BB option - but sometimes it's more fun (and more educational) to roll your own.
Contact Information:
The author, Mike Morris WA6ILQ, can be contacted here.
Back to the top of the page
Back to Astron Index
This page separated from the index page on 25-Jan-2014
This web page, the hand-coded HTML on it, this web site, the information presented in and on its pages and in these modifications and conversions is © Copyrighted 1995 and (date of last update) by Kevin Custer W3KKC and multiple originating authors. All Rights Reserved, including that of paper and web publication elsewhere.